Developing The Data Model
In this section, we build a simple data model and augment it, step by step.
Creating a Class
This part will guide you through creating a class, setting its properties and creating an instance of the new class (a document) in Orienteer.
We will start with the simplest model, with only one class, CmsCustomer. It will have properties Customer name, Contacts and Interaction.
- Go to page /schema.
- To create a new class, сlick Create.
- On the class page, set
Name: CmsCustomerand click Save. On the widget Properties create three properties by clicking Create. Set their parameters:
- For the customerName property, set
Name: customerName,Type: String. - For the contact property, set
Name: contact,Type: String. - For the interaction property, set
Name: interaction,Type: String.
Then click Save.
- For the customerName property, set
- Specify which of the parameters will identify a document. In our case each document corresponds to a customer's name. So, in the class CmsCustomer, on the widget Configuration, set
Document Name Property: customerName.
Now we can create documents of the class CmsCustomer. Each document corresponds to a person.
Once we want to add or edit a customer, we go to the list of class's documents.
- Go to /browse/CmsCustomer (otherwise, on the /schema page, in the line CmsCustomer, on the right, click Browse Class).
- To create a new document, click Create.
- Now you can fill new client's data and save it.
Linking Classes, Managing Property Visualization
This part will guide you through linking classes in Orienteer. You will also learn how to display properties on separate tabs and how to enable basic UI controls to manage properties of a document.
In the app we've just created, we store all contacts in a single plaintext field for skype, telephones, emails etc in bulk. Now we want each customer to have several separate contact records, each containing one contact. We also want contacts of each customer to show on a separate tab.
Do the following:
- From the class CmsCustomer, delete the property contact. We will store contacts in a different way.
Create a new class for storing contacts, CmsContact
We want each customer's contact to be stored as a separate item. This is why we will create a separate class for contacts. We will be able to add as many documents of this class as needed to each customer.
Link the CmsContact and the CmsCustomer classes. For this, add special LINK properties to both classes:
- To the CmsCustomer class, add a property linkToContacts with parameters
Type: LINKLIST,Linked Class: CmsContact. - To the CmsContact class we add a property Customer with parameters:
Type: LINK.Linked Class: CmsCustomer.Visualization: listbox(this will let the app user select a linked customer for a contact from a drop box).Inverse: linkToContacts(here you choose a back link from the list of link type parameters of the linked class, CmsCustomer).
- Go back to the CmsCustomer class and edit the parameter linkToContact. Set its parameter Inverse similarly, by selecting the property Customer.
- To the CmsCustomer class, add a property linkToContacts with parameters
We want each customer's contacts to show on a separate tab. For this, in the class CmsCustomer edit the link property linkToContacts. Set the following parameters:
Tab: Contacts. Now a separate tab named Contacts will show the list of contacts linked to the particular customer.Visualization: table. This enables UI elements like Create or Save buttons etc, that will be helpful to app users for creating and managing contacts.
In the previous step, we have changed the visualization of a property. When we look through the list of customers (the documents of the class CmsCustomer on the page /browse/CmsCustomer), this property, with its buttons and other elements, is not useful. We will hide it from the document list.
To do this, for each property of the class CmsCustomer set its parameter Displayable. Check it for the properties customerName and interaction and uncheck it for the property linkToContacts.
With this, we are done for this part. Now, when you create a customer, you do not give its contacts, only their name and stage of interaction. To add contacts, you will go to each customer's page and, on a separate tab Contacts, add as many contacts as you need.
Viewing the UML of the Data Model
This part will help you to view the UML of your data model in Orienteer.
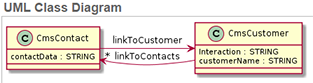
Now we have several classes implemented, and we can view them all on an UML diagram.
To do this, on the schema page (/schema), check the classes CmsCustomer and CmsContact. Then click View UML. You will see the two classes with their links and properties on a UML diagram.
Making a Property Selectable from a List
This part will help you to make a property with values selectable from a list.
Now we can make several contats for a client. But if we would like to index them, we would face the fact that the app operators type in the data in every possible style. Just think, how many ways are there to write the word "email"?
So, for each contact, we want the operators to select the contact type (email, skype etc) from a drop box with a pre-defined set of values.
For this, we create a class CmsContactType. This class will contain three instances (documents) that will represent the allowed contact types.
- Create the class CmsContactType with just a single STRING type property, contactTypeName.
- In this class, create four documents:
- skype
- snail mail
- telephone
- In the class CmsContact, add a property ContactType with following parameters:
Type: LINK.Visualization: listbox(this will let the user select the type of contact from a drop box).Linked Class: CmsContactType.
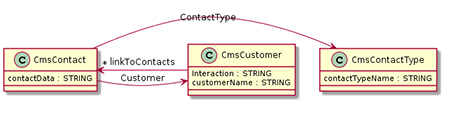
Now you can check any customer's contacts. When you add a new contact or edit an existing one, you will have a drop box to select from a pre-defined set of values.
Let's check the new UML:
Deriving Classes
This part will guide you through deriving subclasses from a parent class in Orienteer.
So far, we store information about interaction with each customer in a string record. This record is voluntarily filled by the CMS operator. We want there to be just three pre-defined types of interaction: purchase, return, support. Each type will have a timestamp and a description, but these three types will differ in additional parameters. So, this is natural to create an abstract class Interacton with common properties and three derived subclasses.
Steps to go:
- Create a class CmsInteraction. In its parameters, check the box Abstract.
- For the class CmsInteraction, create properties:
- customer: set
Type: LINK,Linked Class: CmsCustomer. - timestamp: set
Type: DATETIME.
- customer: set
On the page of the CmsInteraction class, go to the tab Subclasses. Do the following:
- Create the derived class CmsPurchase:
- On the Properties widget, click Save to confirm the inherited properties.
- Create the class-specific string property products that will store the list of purchased products.
- Derive the class CmsReturn with specific string properties returnProducts and claimReason.
- Derive the class CmsSupport with the specific string property chatHistory.
- Create the derived class CmsPurchase:
In the class CmsCustomer, we already have the string-type property interaction, but we want it to be link-type. Delete the property interaction and create a new property with similar name. Set its parameters
Type: LINKLIST,Visualization: table,Linked Class: CmsInteraction,Inverse: customer.- For the class CmsInteraction, for the property customer set
Inverse: interaction. - Let us also have interactions for each customer on a separate tab. For the class CmsCustomer, for the parameter interactions, set
Tab: Interactions.
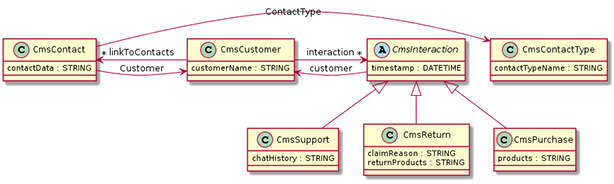
Now we can log our interactions with clients on a separate tab. Let's view the new UML.
Calculable Properties
This part will show you an example of using calculable properties in Orienteer.
For each customer, we have a separate tab with his interactions. The interactions are presented as a table. Let's add a calculable property "new_interaction" that will flag interactions that are more than 1 month old.
To do this, in the abstract class CmsInteraction, create a property new_interaction with parameters: Type: string, Calculable: yes, Script: ...
Localizing a Class
This part will help you localize classes in Orienteer.
Orienteer allows the pages to display names of classes and properties depending on browser locale.
Let's localize the names of the columns on the tab Contacts. To do this, in the class CmsContacts, for each property, go to the tab Localization and add values from the table below:
| Property | Lang | Value |
|---|---|---|
| contactData | en (English) | Contacts |
| contactData | es (Spanish) | Contacto |
| Customer | en (English) | Customer |
| Customer | es (Spanish) | Cliente |
| ContactType | en (English) | Contact type |
| ContactType | es (Spanish) | Tipo de contacto |